Developing Mods
A guide to creating Suzerain mods with MelonLoader and Suzerain Modding Kit. This is a simple guide that should be easy to follow, but it does assume that you have atleast a basic understanding of programming and C#. If you have never programmed in C# before, we highly recommend learning the basics of programming and/or C# first.
This guide is for Windows and Linux. You must own Suzerain on Steam.
Beta Disclaimer
Suzerain Modding Kit is currently in beta and should not be considered stable. Expect bugs and crashes.
Setup
First, follow the Installing Mods guide.
Next, follow the environment setup guide for your OS:
- Windows: See Environment Setup (Windows).
- Linux: See Environment Setup (Linux).
A New Decision
Now that our project is set up. Let's get to coding!
In this guide, we'll make a very simple mod that adds a new decision to the game. The full example project is available here.
SpendBudgetDecision
Create a new public static class SpendBudgetDecision in SpendBudgetDecision.cs. This will be the class that holds the logic for our decision.
Add the imports we will need to the top of the file:
using SuzerainModdingKit;
using SuzerainModdingKit.StoryFragments.Decision;
using SuzerainModdingKit.VanillaData;
Add the following properties to the class:
// Options for this decision.
public const string SpendBudgetOptionText = "Spend budget [-1 Government Budget]";
public const string NothingOptionText = "There is nothing we can do...";

// Game variables for this decision.
public const string SpendBudgetOptionVar = "DecisionExample.SpendBudgetDecision_SpendBudget";
public const string NothingOptionVar = "DecisionExample.SpendBudgetDecision_Nothing";

// The properties for this decision.
public static readonly CustomDecisionFragment Data = new(
    // The unique name of the decision.
    name: "DecisionExample.MyDecision",
    // The story pack that this decision will be displayed in.
    storyPack: SuzerainStoryPackInfo.Sordland,
    // The token that this decision should be displayed on.
    assignedTokenName: SuzerainTokenName.SordlandCityHolsord,
    // The title of the decision when viewed in the decision panel.
    title: "The Budget Question",
    // The description of the decision when viewed in the decision panel.
    description: "We are faced with a choice: Spend government budget for no reason, or don't.",
    // The title of the decision when viewed under the assigned token.
    hubTitle: "The Budget Question",
    // The description of the decision when viewed under the assigned token.
    hubDescription: "Should we spend budget?");
So, what's happening here?
SpendBudgetOptionTextandNothingOptionTextare constant strings containing the text for each option of the decision.SpendBudgetOptionVarandNothingOptionVarare constant strings containing the names of the variables for each option of the decision. We will set the respective variable totruewhen an option is selected and it will be saved to disk with the rest of the Suzerain variables. We will be able to read these variables later to see what option the user selected.Datais a read-only property containing an object that describes the properties of the decision.
Now, add an Init method to the class:
internal static void Init()
{
    // Suzerain Modding Kit needs to know that our variables exist.
    Variables.Register(SpendBudgetOptionVar);
    Variables.Register(NothingOptionVar);
}
Suzerain Modding Kit needs to know that a custom variable exists in order to save/load it. We will call this method when our mod initializes.
Add an OnEvaluateStep method:
internal static void OnEvaluateStep()
{
    // If we're not in Sordland on turn 1 step 2, return.
    if (!GameState.IsCurrentStoryPack(SuzerainStoryPackInfo.Sordland) ||
        GameState.CurrentTurnNum != 1 ||
        GameState.CurrentStepNum != 2)
    {
        return;
    }
    // Why turn 1 step 2? Turn 1 step 1 is only the presidential inauguration scene.
    // Attempting to add a story fragment during that step will throw an exception and may
    // break the game. Step 2 is the first step we can add story fragments to.

    // Return if the decision has already been added.
    if (GameState.StoryFragmentExistsInCurrentStep(Data.Name))
    {
        return;
    }

    // Return if the user has already made a choice.
    if (Variables.GetBool(SpendBudgetOptionVar) || Variables.GetBool(NothingOptionVar))
    {
        return;
    }

    // Add the story fragment to the game. We don't care about the return value, discard it.
    _ = GameState.AddCustomStoryFragment(Data);
}
This method checks if the game is on Sordland turn 1 step 2 because that is the step we want this decision to appear on. It also checks that the user has not already made a choice regarding this decision. If all conditions pass, it adds the decision to the game.
We will call this method whenever a step is evaluted.
Add an OnDecisionShow method:
internal static void OnDecisionShow()
{
    // If the current decision name does not match our decision name, return.
    if (!Data.Name.Equals(DecisionManager.CurrentDecisionName, StringComparison.Ordinal))
    {
        return;
    }

    // Only add the spend budget option if the user has enough budget to spend.
    if (Variables.GetInt("BaseGame.GovernmentBudget") >= 1)
    {
        DecisionManager.AddOption(SpendBudgetOptionText);
    }

    // Always add the nothing option.
    DecisionManager.AddOption(NothingOptionText);
}
This method checks if the current decision name matches the name of our decision. If it does, it adds the options for our decision.
We will call this method whenever a decision shows.
Finally, we need a method to do something when an option is selected. Add an OnDecisionFinished method:
internal static void OnDecisionFinished(DecisionOptionInfo selectedOption)
{
    // If the decision name of the selected option does not match our decision name, return.
    if (!Data.Name.Equals(selectedOption.DecisionName, StringComparison.Ordinal))
    {
        return;
    }

    // If the user selected the spend budget option, set the appropriate variables.
    if (SpendBudgetOptionText.Equals(selectedOption.Text, StringComparison.Ordinal))
    {
        // Subtract 1 from the government budget.
        int governmentBudget = Variables.GetInt("BaseGame.GovernmentBudget");
        Variables.Set("BaseGame.GovernmentBudget", governmentBudget - 1);

        // Set our spend budget option variable to true.
        Variables.Set(SpendBudgetOptionVar, true);

        // Early return.
        return;
    }

    // If we reach this point of the method, the user must have selected the nothing option.
    // Set the appropriate variables.
    Variables.Set(NothingOptionVar, true);
}
This method checks if the relevant decision name matches the name of our decision. If it does, then it sets the appropriate variables based on which option the user selected.
Core
Now, back to the Core class.
Add the imports we will need to the top of the file:
using MelonLoader;
using SuzerainModdingKit;
Replace your existing Core class with the following:
internal sealed class Core : MelonMod
{
    public override void OnInitializeMelon()
    {
        // Listen for these events.
        Events.OnEvaluateStep += OnEvaluateStep;
        Events.OnDecisionShow += OnDecisionShow;
        Events.OnDecisionFinished += OnDecisionFinished;

        // Initialize our decision.
        SpendBudgetDecision.Init();

        LoggerInstance.Msg("Initialized.");
    }

    public void OnEvaluateStep(object sender, EventArgs e)
    {
        // Forward to SpendBudgetDecision.
        SpendBudgetDecision.OnEvaluateStep();
    }

    public void OnDecisionShow(object sender, EventArgs e)
    {
        // Forward to SpendBudgetDecision.
        SpendBudgetDecision.OnDecisionShow();
    }

    public void OnDecisionFinished(object sender, Events.DecisionFinishedEventArgs e)
    {
        // Forward to SpendBudgetDecision.
        SpendBudgetDecision.OnDecisionFinished(e.SelectedOptionInfo);
    }
}
We have updated the Core class to listen to the events we need for our decision, and forward each one to our SpendBudgetDecision class.
Building
Windows: Set the configuration to Debug x64 in the Visual Studio toolbar then select Build > Build Solution. The DLL will automatically be copied to your Mods folder.
Linux:
- Run
dotnet build -c Debug -p:Platform=x64. - If you didn't add a copy post-build target, manually copy the DLL:
- Run
cp bin/x64/Debug/net6/MyMod.dll ~/.local/share/Steam/steamapps/common/Suzerain/Mods/. - If you installed Steam via Flatpak:
cp bin/x64/Debug/net6/MyMod.dll ~/.var/app/com.valvesoftware.Steam/.local/share/Steam/steamapps/common/Suzerain/Mods/.
- Run
Results
The fruits of our labor:
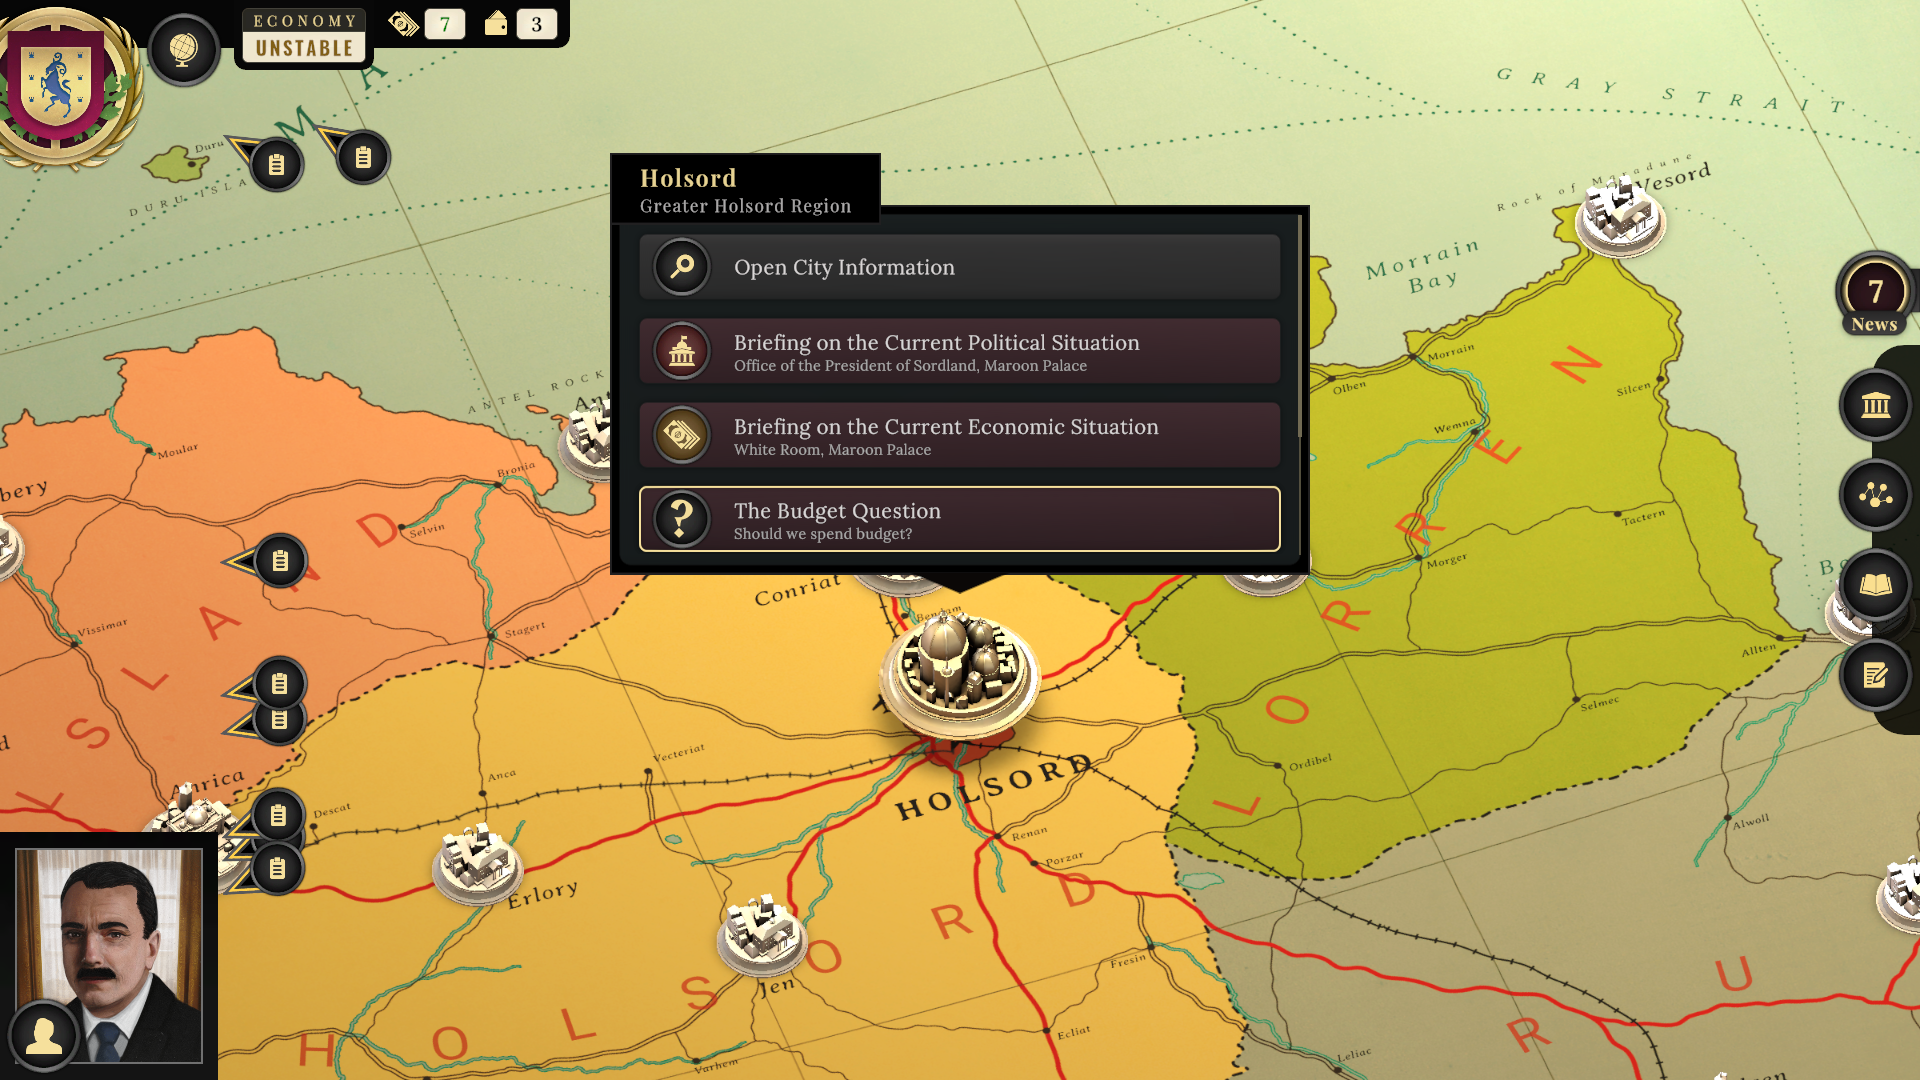
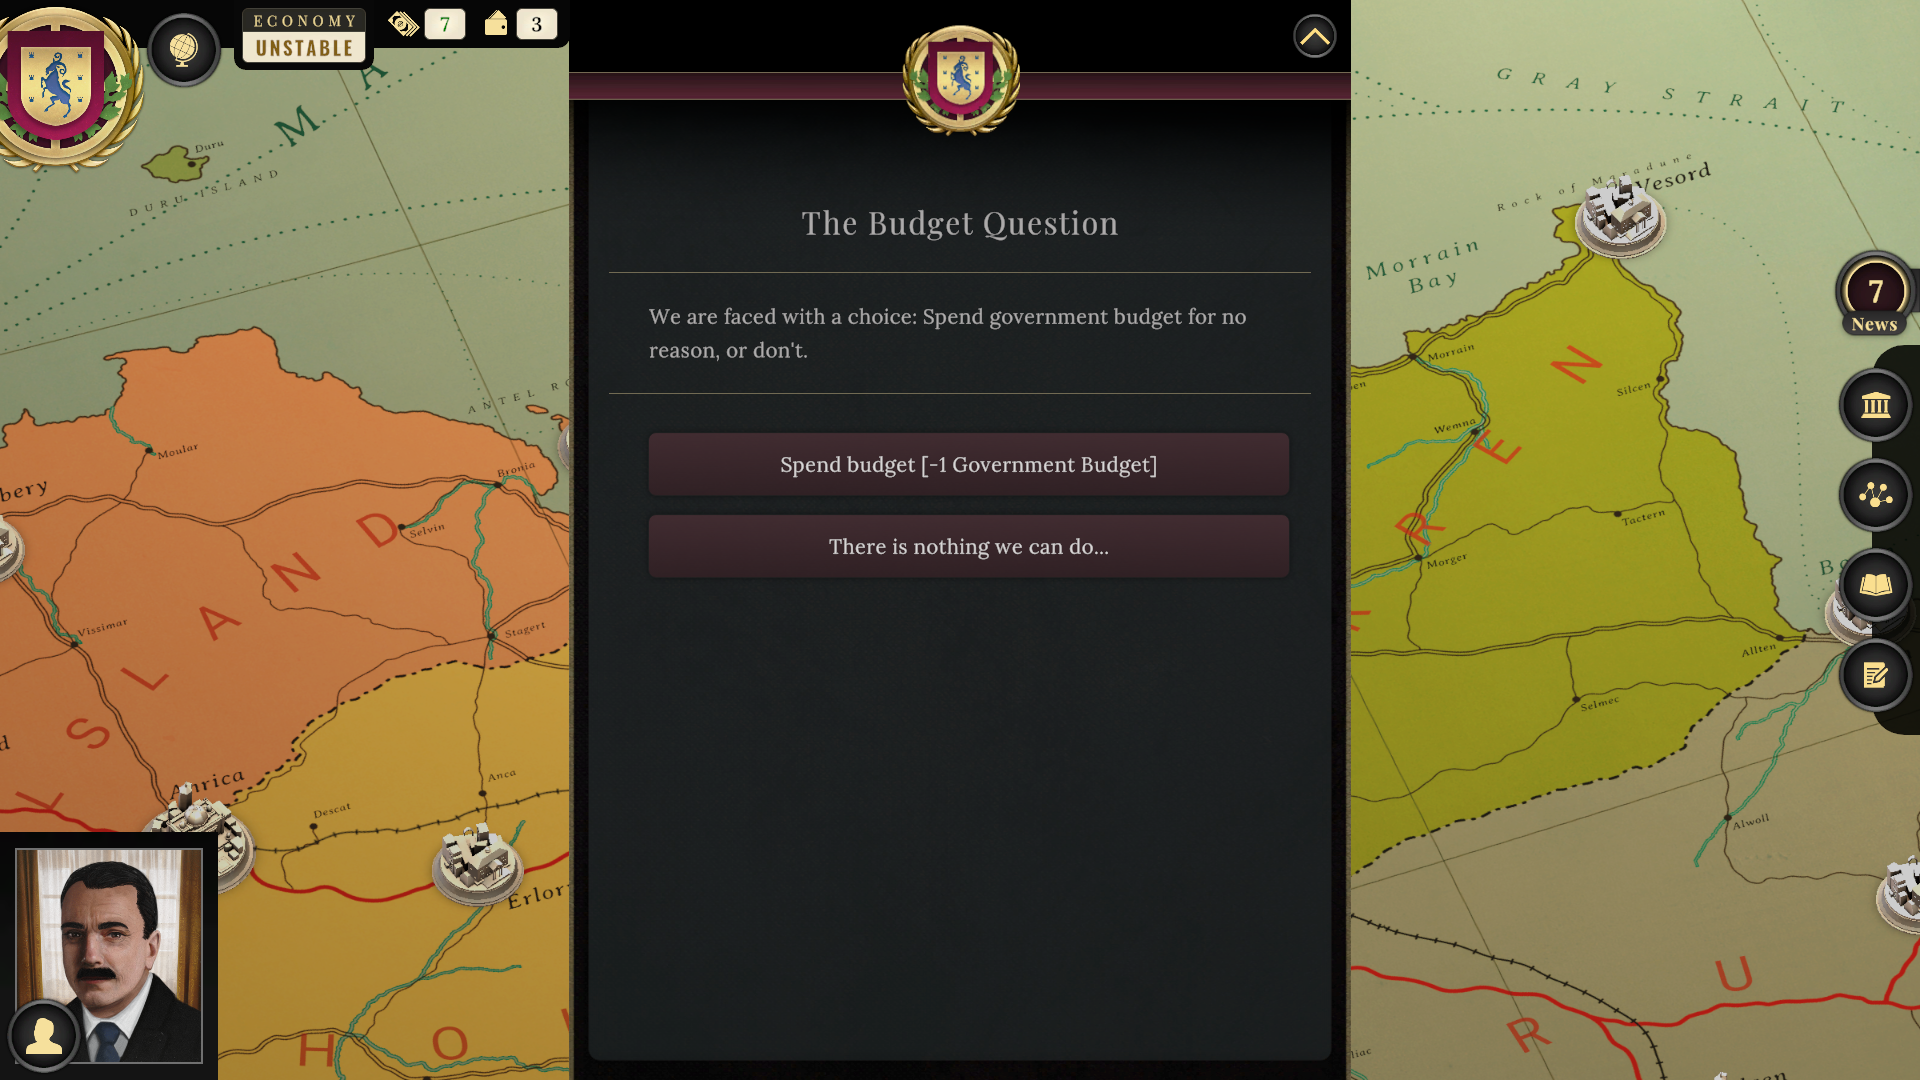
Congratulations! You just made your first Suzerain mod.
Next Steps
- See more development guides.
- See the API reference.
- Where do I post my mods? The recommended site to post mods on is Nexus Mods. You may also promote your mods in the
#mod-promotionschannel on our Discord server.